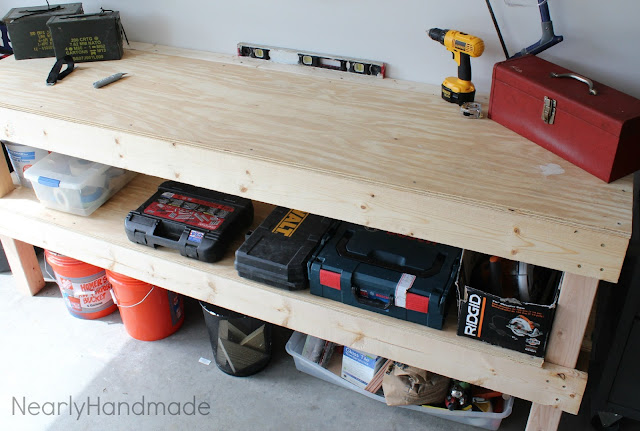
So yes! I built this table myself. From buying the lumber, to making the cuts, to drilling the screws! I guess that goes to show you that as long as you're not fearful of using a saw and have some basic wood working skills (how to use a tape measure, level, & square), you could build this work bench, too! I found this basic design online and adapted and simplified it to fit my needs.
As far as making the cuts, the trickiest part was cutting the 4x4 posts for the legs. A circular saw won't cut through it so you have to be sure to mark your cut line all the way around the board. Then, you'll want to make your cut, stop the saw, rotate the board, make the cut on the line, rotate the board again, and you should be good to go! The most important tip is to take your time with these cuts! I was able to get two legs out of each 8 foot board making the cuts at 40 inches and keeping one "good end" and one "cut end" on each leg. I was able to hide any small imperfections under the table top.
Next, it's time to start assembling the frame of the work bench. I used (2) 2"x6"x8' boards that are uncut. I left an inch and half over hang from each leg (the width of a 2x6). To be sure I had the correct overhang, I used a scrap piece of 2x6 and lined everything up. Once I was sure everything was lined up correctly and I was sure it was very square by using... a square, I put three 3" wood to wood spax screws in each connecting spot. I chose the bottom shelf height by measuring the orange home depot buckets to be able to slide under the work bench. This measurement was 15 inches from the bottom of the leg post to the bottom of the 2x6.
To make the other side of the work bench, you'll assemble everything the same, but I cut 3 inches off of the 2x6x8's so the board will sit flush to the 4x4 leg posts. (We're making this frame to fit the table tops which is a 4'x8' sheet of plywood that's 3/4" thick, cut in half length-wise by the kind gentlemen at Lowe's).
The four shorter pieces to finish off your rectangle frame is going to be the same cut, 4 times. That's pretty easy! The measurement you're looking for here is 22.5 inches. That's because your table top pieces are 24 inches deep minus the width of that 2x6 (1.5 inches) that hangs past the 4x4.
Okay, so before you get too far ahead of yourself and assemble an entire frame without table tops, you need to make sure you fit in the bottom section. To do this you'll need to notch out the corners. Since the 4x4 posts are never actually 4 inches (they're 3.5") you'll need to add that to the width of the 2x6 (which is never 2 inches... it's 1.5"). So notch out a 5x5 square in each corner. I used a jig saw to make the notched out cuts.
The most important part of this whole build is coming up: ready? You've gotta really make sure those 4 corner posts are straight and level. This might take a while and you might be sweating your butt off in 90% humidity, but stick with it and take a water break. If you don't make sure those corners are level, you're whole work bench is going to be crap. Yup, crap. I'll tell you a secret. When you're picking out your lumber at the hardware store, do your best to find some nice straight pieces of wood. That's going to make building this thing SO much easier. I thought I found some decent pieces of wood, but when I had two kiddos squawking at me while digging through a lumber pile, I must have made some rash decisions. It took a lot of muscle to get things straight enough to drill some screws into place.
Once everything is straight and level, you can finish assembling your frame and then flop on that top. It's the most gratifying part of this project because, yeah... you're done!
Need a lumber and supply list? Here we go:
Work Bench Lumber List
-(1) 4'x8'x3/4" plywood (sliced in half length-wise by the kind people at Lowes)
-(2) 4"x4"x8'
-(5) 2"x6"x8'
-Box of 3" wood to wood counter sinking screws
-Box of 1 5/8" wood to wood counter sinking screws or deck screws
Yup. That's it! Now, get to building and surprise your husband with this great work bench! I know you can do it! If you have any questions, be sure to drop me a line!
Janice
Linked up to these lovely parties:
-AlderberryHill, SumosSweetStuff, HomeStoriesAtoZ


No comments:
Post a Comment
If you have a question and your profile is attached to your email address, I'll send you an email! If not, check back here and I'll leave your response under your comment. Don't have a question? I'd love for you to say "hello", anyway! :)